Consul Cluster 구성하기
목표
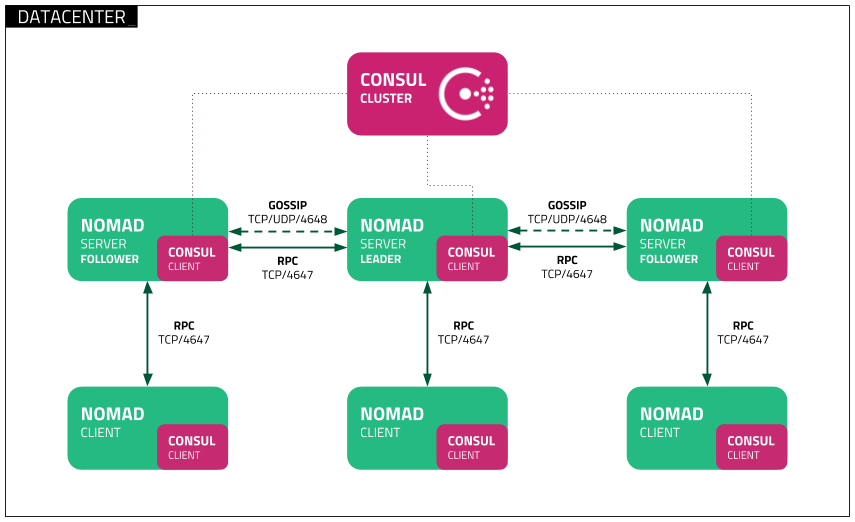
Consul Cluster 를 구성합니다.
Consul Server 는 독립서버로 3대 또는 5대가 권장됩니다.
Consul Client 는 Nomad Server/Client 에 설치됩니다.
보안그룹 생성
allow-consul 보안그룹을 생성합니다.
규칙은 추가하지 않습니다.
protect-consul 보안그룹을 생성합니다.
인바운드에 소스가 allow-consul 보안그룹인 트래픽을 모두 허용해줍니다.
Consul Server 생성
메모리는 512M 로 합니다.
보안그룹은 allow-consul, protect-consul, 그리고 내아이피에 대한 모든 트래픽을 허용하는 보안그룹을 추가해 줍니다.
태그에 키는 ConsulServer, 값은 Y 인 태그를 추가해 줍니다.
키와 값에는 띄어쓰기를 하지 않습니다.
docker 를 설치합니다.
sudo yum install docker -y
docker -v
sudo service docker start
sudo systemctl enable docker.service
Consul Server 를 설치합니다.
sudo docker run \
    -d \
    -p 8500:8500 \
    -p 8600:8600/udp \
    -p 8300-8302:8300-8302 \
    -p 8301-8302:8301-8302/udp \
    --name=consul-server-1 \
    --restart=always \
    consul agent -server -ui -node=consul-server-1 -bootstrap-expect=1 -client=0.0.0.0 -advertise=<인스턴스 프라이빗 아이피>
sudo docker exec consul-server-1 consul members
Node Address Status Type Build Protocol DC Segment
consul-server-1 172.17.0.2:8301 alive server 1.10.1 2 dc1 <all>Consul Client 생성
메모리는 512M 로 합니다.
보안그룹은 allow-consul, protect-consul, 그리고 내아이피에 대한 모든 트래픽을 허용하는 보안그룹을 추가해 줍니다.
docker 를 설치합니다.
sudo yum install docker -y
docker -v
sudo service docker start
sudo systemctl enable docker.service
Consul Client 를 설치합니다.
sudo docker run \
    -p 8300-8302:8300-8302 \
    -p 8301-8302:8301-8302/udp \
    --name=consul-client-1 \
    consul agent -node=consul-client-1 -advertise=<클라이언트 인스턴스 프라이빗 아이피> -join=<서버 인스턴스 프라이빗 아이피>
2021-08-21T10:40:35.866Z [INFO] agent.client.serf.lan: serf: EventMemberJoin: consul-server-1 172.31.49.46
2021-08-21T10:40:35.866Z [INFO] agent.client: adding server: server="consul-server-1 (Addr: tcp/172.31.49.46:8300) (DC: dc1)"
2021-08-21T10:40:35.867Z [INFO] agent: (LAN) joined: number_of_nodes=1
2021-08-21T10:40:35.867Z [INFO] agent: Join completed. Initial agents synced with: agent_count=1
2021-08-21T10:40:35.867Z [INFO] agent: started state syncer
2021-08-21T10:40:35.867Z [INFO] agent: Consul agent running!
2021-08-21T10:40:35.874Z [INFO] agent: Synced node info정상적으로 접속되었는지 서버에서 확인해 봅니다.
sudo docker exec consul-server-1 consul members
Node             Address             Status  Type    Build   Protocol  DC   Segment
consul-server-1  172.31.49.46:8301   alive   server  1.10.1  2         dc1  <all>
consul-client-1  172.31.15.157:8301  alive   client  1.10.1  2         dc1  <default>
실행시켰던 클라이언트를 삭제하고 deamon 모드로 재실행 합니다.
sudo docker stop consul-client-1
sudo docker rm consul-client-1

sudo docker run \
    -d \
    -p 8300-8302:8300-8302 \
    -p 8301-8302:8301-8302/udp \
    --name=consul-client-1 \
    --restart=always \
    consul agent -node=consul-client-1 -advertise=<클라이언트 인스턴스 프라이빗 아이피> -join=<서버 인스턴스 프라이빗 아이피>
서버 아이피 없이 접속하기
정책 생성
IAM > 액세스 관리 > 정책 에서 정책생성을 클릭합니다.
정책이름은 DescribeInstances 로하고 아래와 같이 json 데이타를 입력하고 저장합니다.
{
   "Version": "2012-10-17",
   "Statement": [{
      "Effect": "Allow",
      "Action": [
         "ec2:DescribeInstances"
      ],
      "Resource": "*"
   }
   ]
}
역할 생성
IAM > 액세스 관리 > 역할 에서 역할생성을 클릭합니다.
역할이름은 DescribeInstancesRole 으로 하고 DescribeInstances 선택하고 저장합니다.
EC2 인스턴스에 Role 추가
위에서 생성한 역할을 EC2 인스턴스에 추가해 줍니다.
기존 클라이언트를 삭제합니다.
sudo docker stop consul-client-1
sudo docker rm consul-client-1
서버에서 확인해 보면 상태가 left 상태입니다.
sudo docker exec consul-server-1 consul members
Node             Address             Status  Type    Build   Protocol  DC   Segment
consul-server-1  172.31.49.46:8301   alive   server  1.10.1  2         dc1  <all>
consul-client-1  172.31.15.157:8301  left    client  1.10.1  2         dc1  <default>
클라이언트에서 아래 명령을 실행합니다.
sudo docker run \
    -d \
    -p 8300-8302:8300-8302 \
    -p 8301-8302:8301-8302/udp \
    --name=consul-client-1 \
    --restart=always \
    consul agent -node=consul-client-1 -advertise=<클라이언트 인스턴스 프라이빗 아이피> -retry-join "provider=aws tag_key=ConsulServer tag_value=Y region=ap-northeast-2"
서버에서 확인해 보면 alive 상태임을 확인할 수 있습니다.
sudo docker exec consul-server-1 consul members
Node             Address             Status  Type    Build   Protocol  DC   Segment
consul-server-1  172.31.49.46:8301   alive   server  1.10.1  2         dc1  <all>
consul-client-1  172.31.15.157:8301  alive   client  1.10.1  2         dc1  <default>
이것도 테스트.