사설 인증서 생성하기
OpenSSL 설치
MS Windows 의 경우 아래 사이트에서 OpenSSL 을 다운받아 설치합니다.
https://slproweb.com/products/Win32OpenSSL.html
사설 인증서 생성
루트 인증서 생성
openssl ecparam -out rootCA.key -name prime256v1 -genkeyopenssl req -new -sha256 -key rootCA.key -out rootCA.csr
You are about to be asked to enter information that will be incorporated
into your certificate request.
What you are about to enter is what is called a Distinguished Name or a DN.
There are quite a few fields but you can leave some blank
For some fields there will be a default value,
If you enter '.', the field will be left blank.
-----
Country Name (2 letter code) [AU]:KR
State or Province Name (full name) [Some-State]:Seoul
Locality Name (eg, city) []:Seoul
Organization Name (eg, company) [Internet Widgits Pty Ltd]:Home
Organizational Unit Name (eg, section) []:Home
Common Name (e.g. server FQDN or YOUR name) []:
Email Address []:
Please enter the following 'extra' attributes
to be sent with your certificate request
A challenge password []:
An optional company name []: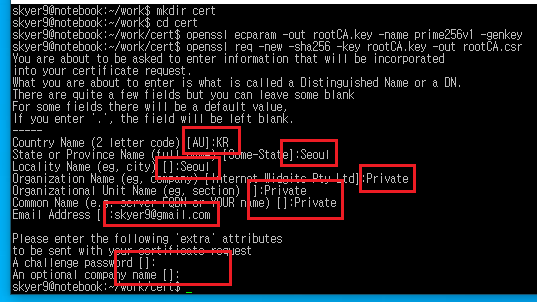
openssl x509 -req -sha256 -days 999999 -in rootCA.csr -signkey rootCA.key -out rootCA.crt서버용 인증서 생성
웹서버 등에서 사용될 인증서를 생성합니다.
openssl ecparam -out server.key -name prime256v1 -genkeyopenssl req -new -sha256 -key server.key -out server.csr
You are about to be asked to enter information that will be incorporated
into your certificate request.
What you are about to enter is what is called a Distinguished Name or a DN.
There are quite a few fields but you can leave some blank
For some fields there will be a default value,
If you enter '.', the field will be left blank.
-----
Country Name (2 letter code) [AU]:KR
State or Province Name (full name) [Some-State]:Seoul
Locality Name (eg, city) []:Seoul
Organization Name (eg, company) [Internet Widgits Pty Ltd]:Home
Organizational Unit Name (eg, section) []:Home
Common Name (e.g. server FQDN or YOUR name) []:
Email Address []:
Please enter the following 'extra' attributes
to be sent with your certificate request
A challenge password []:
An optional company name []: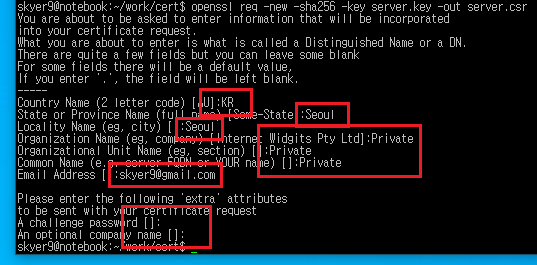
extention.ext 파일을 생성합니다.
파일의 내용은 아래의 내용으로 합니다.
alt_names 탭에 원하는 도메인을 추가해 줍니다.
도메인은 DNS 로 입력하고, 아이피의 경우 IP 로 입력합니다.
아이피의 경우 111.222.111.* 와 같은 와일드 문자를 사용할 수 없습니다.
authorityKeyIdentifier=keyid,issuer
basicConstraints=CA:FALSE
keyUsage = digitalSignature, nonRepudiation, keyEncipherment, dataEncipherment
subjectAltName = @alt_names

[alt_names]
DNS.1 = localhost
DNS.2 = *.localhost
IP.1 = 111.222.111.222
IP.2 = 111.222.111.223
아래 명령으로 인증서(crt) 파일을 생성합니다.
openssl x509 -req -sha256 -days 999999 -in server.csr -CA rootCA.crt -CAkey rootCA.key -CAcreateserial -out server.crt -extfile extention.ext인증서가 정상적으로 생성되었는지 확인할 수 있습니다.
openssl x509 -in server.crt -text -noout사설 인증서 적용
스프링 부트
cat server.crt rootCA.crt > server.pem
# type server.crt rootCA.crt > server.pem
-passin pass: -passout pass: 를 파라미터로 추가해서 비밀번호를 생략하게 할 수 있습니다.
openssl pkcs12 -export -inkey server.key -in server.pem -out key.pkcs12 -name System
Enter Export Password:
Verifying - Enter Export Password:
application.yml 파일에 아래 내용을 입력합니다.
server:
  ssl:
    enabled: true
    key-store: key.pkcs12
    key-store-password:      # 비밀번호를 입력한 경우
    key-store-type: PKCS12
    key-alias: System        # Name 에 입력한 것
프로젝트 루트 에 key.pkcs12 를 추가 후 프로젝트를 실행합니다.
로그에 아래 내용이 표시됩니다.
Tomcat started on port 8080 (https) with context path ''https://localhost:8080/ 에 접속하면 SSL 이 활성화된 것을 확인할 수 있습니다.
Node JS
const path = require("path");
const express = require('express');
const http = require('http');
const https = require('https');
const fs = require('fs');

const HTTP_PORT = 8080;
const HTTPS_PORT = 8443;

const options = {
    // key: fs.readFileSync('./rootCa.key'),
    // cert: fs.readFileSync('./rootCa.crt')
    key: fs.readFileSync('./server.key'),
    cert: fs.readFileSync('./server.crt')
};

const app = express();

app.use("/", (req, res)=>{
    res.sendFile(path.join(__dirname, './index.html'));
})

const HTTPServer = http.createServer(app).listen(HTTP_PORT);
const HTTPSServer = https.createServer(options, app).listen(HTTPS_PORT);
Linux (Ubuntu, Debian)
sudo cp rootCA.crt /usr/local/share/ca-certificates/
sudo update-ca-certificates
브라우저 크롬은 OS 인증서 대신 자체 인증서로 체크합니다.(https 작동안함)
Linux (CentOs 6)
sudo yum install ca-certificates
sudo update-ca-trust force-enable
sudo cp rootCA.crt /etc/pki/ca-trust/source/anchors/
sudo update-ca-trust extract
Linux (CentOs 5)
sudo cat rootCA.crt >> /etc/pki/tls/certs/ca-bundle.crtWindows 10
Reboot Required!!!
관리자 권한으로 도스창에서 아래 명령을 입력합니다.
재부팅하면 경고창 없이 https://localhost:8080/ 를 접속할 수 있습니다.
certutil -addstore -f "ROOT" rootCA.crt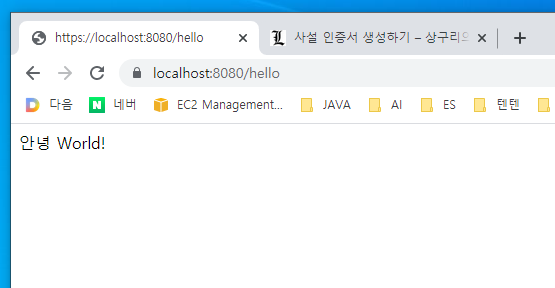
Mac OS X
sudo security add-trusted-cert -d -r trustRoot -k /Library/Keychains/System.keychain ~/new-root-certificate.crtchrome
크롬은 인증서를 별도로 관리한다.
설정 > 개인정보 및 보안 > 보안 > 기기 인증서 관리 에서 루트인증서를 추가해 준다.
신뢰할 수 있는 루트 인증기관에 추가해야 합니다.
크롬 재시작 필요!!!
JDK 에 루트인증서 적용
여기 참조
여기 참조
Pingback: Spring Boot https for localhost – 상구리의 기술 블로그