Kubernetes – Spring Boot Hello World 와 정적 리소스 프로젝트 배포하기
이 글은 Kubernetes – ArgoCD + Helm 으로 Native Helm + GitOps Values 패턴 구성하기 의 후속편입니다. 2편에서 만든 단일 노드 클러스터(Debian 13 / Raspberry Pi,
192.168.20.206)와k8s-gitops저장소를 그대로 사용합니다.
0. 목표
이번 글에서는 직접 만든 애플리케이션 2개를 2편과 같은 Native Helm + GitOps Values 패턴으로 배포합니다.
- spring-hello : Spring Boot 로 만든 Hello World 웹 애플리케이션 (Thymeleaf 페이지 1장 + JSON API 1개)
- static-web : 이미지, CSS 같은 정적 리소스만 서빙하는 nginx 컨테이너
spring-hello 의 HTML 페이지는 CSS 와 이미지를 static-web 에서 불러옵니다. 실제 서비스에서 WAS 와 정적 리소스 서버(또는 CDN)를 분리하는 구조를 홈랩에서 그대로 연습하는 것이 목적입니다.
2편과 달라지는 점은 하나입니다. nginx 공식 이미지 대신 내가 빌드한 이미지를 써야 하므로, 이미지를 빌드해서 레지스트리에 올리는 단계(CI)가 추가됩니다.
1. 전체 구조
저장소는 3개를 사용합니다. 앱 저장소 2개(spring-hello, static-web)는 이미지를 만들고, 2편의 k8s-gitops 는 그 이미지의 어느 태그를 배포할지만 결정합니다.
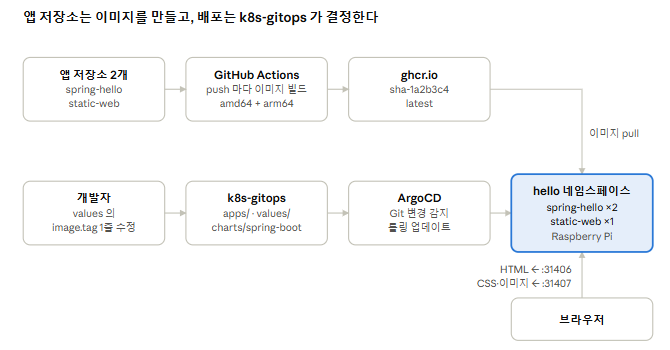
윗줄은 앱 저장소에 push 할 때마다 자동으로 돌고, 아랫줄은 values 의 image.tag 를 바꿔 push 할 때만 돕니다. 브라우저는 spring-hello 에서 HTML 을, static-web 에서 CSS·이미지를 각각 받습니다.
2. Spring Boot Hello World 프로젝트 (spring-hello)
Spring Boot 는 2026년 6월 GA 된 4.1.x, Java 는 LTS 인 25 를 사용합니다. start.spring.io 에서 아래처럼 만들면 됩니다.
- Project: Gradle – Groovy / Language: Java / Spring Boot: 4.1.x / Java: 25
- Group:
com.example/ Artifact:spring-hello - Dependencies: Spring Web, Thymeleaf, Spring Boot Actuator
spring-hello/
├── .github/workflows/build.yml      # 4장
├── Dockerfile
├── build.gradle
└── src/main/
    ├── java/com/example/hello/
    │   ├── SpringHelloApplication.java
    │   └── HelloController.java
    └── resources/
        ├── application.yaml
        └── templates/index.html
2.1 build.gradle
start.spring.io 가 만들어 준 파일에서 jar 파일 이름 고정과 plain jar 비활성화 두 가지만 추가합니다. Dockerfile 에서 build/libs/app.jar 하나만 복사하기 위해서입니다.
plugins {
    id 'java'
    id 'org.springframework.boot' version '4.1.0'   // start.spring.io 가 넣어 준 최신 패치 그대로
    id 'io.spring.dependency-management' version '1.1.7'
}

group = 'com.example'
version = '0.0.1'

java {
    toolchain {
        languageVersion = JavaLanguageVersion.of(25)
    }
}

repositories {
    mavenCentral()
}

dependencies {
    implementation 'org.springframework.boot:spring-boot-starter-webmvc'
    implementation 'org.springframework.boot:spring-boot-starter-thymeleaf'
    implementation 'org.springframework.boot:spring-boot-starter-actuator'
    testImplementation 'org.springframework.boot:spring-boot-starter-test'
}

// ★ 추가
bootJar {
    archiveFileName = 'app.jar'
}
jar {
    enabled = false
}
Spring Boot 4 부터
spring-boot-starter-web은spring-boot-starter-webmvc로 이름이 바뀌었습니다. 예전 이름도 동작하지만 deprecated 입니다.
2.2 HelloController.java
페이지 1장(/)과 JSON API 1개(/api/hello)를 만듭니다. 응답에 파드 이름(HOSTNAME) 을 넣어 두면 레플리카 2개에 요청이 나뉘는 것을 눈으로 확인할 수 있습니다.
package com.example.hello;

import java.util.Map;

import org.springframework.beans.factory.annotation.Value;
import org.springframework.stereotype.Controller;
import org.springframework.ui.Model;
import org.springframework.web.bind.annotation.GetMapping;
import org.springframework.web.bind.annotation.ResponseBody;

@Controller
public class HelloController {

    @Value("${app.static-base-url}")
    private String staticBaseUrl;

    @Value("${app.version}")
    private String version;

    private final String hostname = System.getenv().getOrDefault("HOSTNAME", "local");

    @GetMapping("/")
    public String index(Model model) {
        model.addAttribute("staticBaseUrl", staticBaseUrl);
        model.addAttribute("version", version);
        model.addAttribute("hostname", hostname);
        return "index";
    }

    @GetMapping("/api/hello")
    @ResponseBody
    public Map<String, String> hello() {
        return Map.of(
                "message", "Hello, World!",
                "version", version,
                "pod", hostname);
    }
}
2.3 application.yaml
정적 리소스 서버 주소는 코드에 하드코딩하지 않고 설정값으로 둡니다. 쿠버네티스에서는 환경변수 APP_STATIC_BASE_URL 로 덮어씁니다(Spring 의 relaxed binding).
app:
  static-base-url: http://localhost:8081   # 로컬 개발용 기본값
  version: local

management:
  endpoints:
    web:
      exposure:
        include: health,info
  endpoint:
    health:
      probes:
        enabled: true        # /actuator/health/liveness, /readiness 활성화
2.4 templates/index.html
CSS 와 이미지는 staticBaseUrl 을 앞에 붙여서 static-web 에서 가져옵니다.
<!DOCTYPE html>
<html xmlns:th="http://www.thymeleaf.org" lang="ko">
<head>
    <meta charset="UTF-8">
    <title>Spring Hello</title>
    <link rel="stylesheet" th:href="${staticBaseUrl + '/css/style.css'}">
</head>
<body>
<main class="card">
    <img th:src="${staticBaseUrl + '/img/logo.png'}" alt="logo" class="logo">
    <h1>Hello, World!</h1>
    <p>version : <span th:text="${version}">local</span></p>
    <p>pod : <span th:text="${hostname}">local</span></p>
</main>
</body>
</html>
2.5 Dockerfile
jar 는 GitHub Actions 러너에서 미리 빌드하고(4장), Dockerfile 은 복사만 합니다. RUN 명령이 없으므로 arm64 이미지를 만들 때 QEMU 에뮬레이션이 필요 없고 빌드가 빠릅니다.
FROM eclipse-temurin:25-jre

WORKDIR /app
COPY build/libs/app.jar app.jar

# 컨테이너 메모리 limit 의 75% 를 힙으로 사용
ENV JAVA_TOOL_OPTIONS="-XX:MaxRAMPercentage=75"

# root 로 실행하지 않음 (숫자 UID 는 RUN useradd 없이도 사용 가능)
USER 1000:1000

EXPOSE 8080
ENTRYPOINT ["java", "-jar", "/app/app.jar"]
로컬 확인
./gradlew bootRun
curl http://localhost:8080/api/hello
3. 정적 리소스 프로젝트 (static-web)
정적 리소스는 별도 저장소로 분리하고, 파일을 nginx 이미지 안에 넣어서 배포합니다. 디자이너나 프론트엔드 담당이 CSS·이미지만 고쳐서 push 해도 WAS 를 다시 빌드할 필요가 없습니다.
static-web/
├── .github/workflows/build.yml      # 4장
├── Dockerfile
├── nginx/
│   └── default.conf
└── html/
    ├── index.html                   # 정적 서버 자체 확인용
    ├── css/
    │   └── style.css
    └── img/
        └── logo.jpg                 # 아무 PNG 파일
3.1 html/css/style.css
body {
    margin: 0;
    min-height: 100vh;
    display: grid;
    place-items: center;
    font-family: system-ui, sans-serif;
    background: #f2f4f7;
}

.card {
    padding: 40px 56px;
    border-radius: 12px;
    background: #fff;
    box-shadow: 0 2px 12px rgba(0, 0, 0, .08);
    text-align: center;
}

.logo {
    width: 96px;
}
html/index.html 은 정적 서버만 단독으로 열었을 때 확인용입니다.
<!DOCTYPE html>
<html lang="ko">
<head>
    <meta charset="UTF-8">
    <title>static-web</title>
    <link rel="stylesheet" href="/css/style.css">
</head>
<body>
<main class="card">
    <img src="/img/logo.png" alt="logo" class="logo">
    <h1>static-web OK</h1>
</main>
</body>
</html>
3.2 nginx/default.conf
이미지 기본 설정을 덮어써서 정적 파일 캐시 헤더와 헬스체크 경로를 추가합니다.
server {
    listen       80;
    server_name  _;
    root         /usr/share/nginx/html;

    location / {
        try_files $uri $uri/ =404;
    }

    # 정적 파일: 브라우저 캐시 1시간
    location ~* \.(css|js|png|jpe?g|gif|svg|webp|ico|woff2?)$ {
        expires 1h;
        access_log off;
        # 다른 포트(=다른 origin)의 spring-hello 페이지에서 폰트·fetch 로 읽을 때 필요
        add_header Access-Control-Allow-Origin "*";
    }

    # k8s probe 용
    location = /healthz {
        access_log off;
        default_type text/plain;
        return 200 "ok";
    }
}
<link rel="stylesheet">와<img>는 다른 origin 에서 불러와도 CORS 헤더가 필요 없습니다. 나중에 웹폰트(@font-face)나 JS 의fetch()로 읽는 파일이 생기면 그때 위Access-Control-Allow-Origin이 필요합니다.
3.3 Dockerfile
# 운영에서는 nginx:1.xx-alpine 처럼 버전을 고정하세요
FROM nginx:stable-alpine

COPY nginx/default.conf /etc/nginx/conf.d/default.conf
COPY html/ /usr/share/nginx/html/
이 Dockerfile 도 RUN 이 없어서 arm64 이미지를 에뮬레이션 없이 바로 만들 수 있습니다.
로컬 확인 (2.3 의 기본값 http://localhost:8081 과 포트를 맞춥니다)
docker build -t static-web .
docker run --rm -p 8081:80 static-web

# 다른 터미널에서 spring-hello 를 bootRun 한 뒤
# http://localhost:8080/ 접속 → 스타일과 로고가 보이면 성공
4. GitHub Actions 로 이미지 빌드 → ghcr.io push
라즈베리 파이에서 직접 docker build 해도 되지만, 클러스터 노드에서 빌드하는 것은 GitOps 흐름과 맞지 않습니다. 이미지는 GitHub Actions 가 빌드해서 GitHub Container Registry(ghcr.io) 에 올리고, 클러스터는 받아 가기만 합니다.
linux/arm64(라즈베리 파이)와linux/amd64(개발 PC) 이미지를 함께 만듭니다- 태그는 커밋 해시 기반
sha-xxxxxxx와latest를 붙이고, 클러스터에서는sha-태그만 사용합니다 (7장) - 인증은 Actions 기본 제공
GITHUB_TOKEN을 사용하므로 별도 토큰이 필요 없습니다
4.1 spring-hello/.github/workflows/build.yml
name: build

on:
  push:
    branches: [ main ]
  workflow_dispatch:

permissions:
  contents: read
  packages: write          # ghcr.io push 권한

jobs:
  build:
    runs-on: ubuntu-latest
    steps:
      - uses: actions/checkout@v5

      - uses: actions/setup-java@v5
        with:
          distribution: temurin
          java-version: '25'
          cache: gradle

      - name: Build jar
        run: ./gradlew bootJar --no-daemon

      - uses: docker/setup-buildx-action@v3

      - uses: docker/login-action@v3
        with:
          registry: ghcr.io
          username: ${{ github.actor }}
          password: ${{ secrets.GITHUB_TOKEN }}

      - id: meta
        uses: docker/metadata-action@v5
        with:
          images: ghcr.io/${{ github.repository_owner }}/spring-hello
          tags: |
            type=sha,prefix=sha-
            type=raw,value=latest

      - uses: docker/build-push-action@v7
        with:
          context: .
          platforms: linux/amd64,linux/arm64
          push: true
          tags: ${{ steps.meta.outputs.tags }}
          labels: ${{ steps.meta.outputs.labels }}
4.2 static-web/.github/workflows/build.yml
Java 빌드 단계만 빠지고 나머지는 같습니다.
name: build

on:
  push:
    branches: [ main ]
  workflow_dispatch:

permissions:
  contents: read
  packages: write

jobs:
  build:
    runs-on: ubuntu-latest
    steps:
      - uses: actions/checkout@v5
      - uses: docker/setup-buildx-action@v3
      - uses: docker/login-action@v3
        with:
          registry: ghcr.io
          username: ${{ github.actor }}
          password: ${{ secrets.GITHUB_TOKEN }}
      - id: meta
        uses: docker/metadata-action@v5
        with:
          images: ghcr.io/${{ github.repository_owner }}/static-web
          tags: |
            type=sha,prefix=sha-
            type=raw,value=latest
      - uses: docker/build-push-action@v7
        with:
          context: .
          platforms: linux/amd64,linux/arm64
          push: true
          tags: ${{ steps.meta.outputs.tags }}
          labels: ${{ steps.meta.outputs.labels }}
액션의 메이저 버전(
@v5,@v7등)은 작성 시점 기준입니다. 각 액션 저장소의 Releases 에서 최신 메이저 버전을 확인하세요.
4.3 패키지를 Public 으로 변경
처음 push 된 ghcr.io 패키지는 Private 입니다. 홈랩에서는 Public 으로 바꾸는 것이 가장 간단합니다.
- GitHub 프로필 → Packages →
spring-hello - Package settings → Danger Zone → Change visibility → Public
static-web도 동일하게
클러스터 노드에서 받아지는지 확인합니다.
# sudo crictl pull ghcr.io/<YOUR_ID>/spring-hello:latest
# sudo crictl pull ghcr.io/<YOUR_ID>/static-web:latest

sudo ctr -n k8s.io images pull --platform linux/arm64 ghcr.io/<YOUR_ID>/spring-hello:latest
sudo ctr -n k8s.io images pull --platform linux/arm64 ghcr.io/<YOUR_ID>/static-web:latest

sudo ctr -n k8s.io images ls | grep <YOUR_ID>
ghcr.io 이미지 경로는 소문자만 허용됩니다. GitHub ID 에 대문자가 있다면 values 에서는 소문자로 적어야 합니다.
push 가 끝나면 Actions 로그 또는 패키지 페이지에서 sha- 로 시작하는 태그(예: sha-1a2b3c4)를 확인해 둡니다. 다음 장에서 values 에 적을 값입니다.
5. k8s-gitops 저장소에 추가
2편의 규칙(apps/ = 무엇을·어느 버전으로, values/ = 어떻게)을 그대로 따릅니다. 추가되는 파일은 다음과 같습니다.
k8s-gitops/
├── apps/
│   ├── spring-hello.yaml            # ★ 추가
│   └── static-web.yaml              # ★ 추가
├── values/
│   ├── spring-hello/values.yaml     # ★ 추가
│   └── static-web/values.yaml       # ★ 추가
└── charts/
    ├── nginx/                       # 2편 차트 → static-web 에 재사용
    └── spring-boot/                 # ★ 추가 (Spring Boot 앱 공용 차트)
        ├── Chart.yaml
        ├── values.yaml
        └── templates/
            ├── deployment.yaml
└── service.yaml- static-web 은 결국 nginx 이미지이므로 2편의
charts/nginx를 그대로 재사용하고, values 에서 이미지만 바꿉니다. - spring-hello 는 포트(8080), 헬스체크(actuator), JVM 메모리 설정이 필요하므로
charts/spring-boot를 새로 만듭니다. 앱 이름을 Release 이름으로 쓰기 때문에, 이후 만드는 Spring Boot 앱도 values 파일 하나만 추가하면 됩니다.
5.1 charts/spring-boot
charts/spring-boot/Chart.yaml
apiVersion: v2
name: spring-boot
description: Spring Boot 앱 공용 차트
type: application
version: 0.1.0
charts/spring-boot/values.yaml (차트 기본값)
replicaCount: 1

image:
  repository: ""
  tag: ""

imagePullSecrets: []        # private 레지스트리일 때만 사용 (8장)

containerPort: 8080

# 환경변수 (KEY: value)
env: {}

service:
  type: ClusterIP
  port: 80
  nodePort: null

resources:
  requests: { cpu: 100m, memory: 256Mi }
  limits:   { memory: 512Mi }
charts/spring-boot/templates/deployment.yaml
apiVersion: apps/v1
kind: Deployment
metadata:
  name: {{ .Release.Name }}
  labels:
    app: {{ .Release.Name }}
spec:
  replicas: {{ .Values.replicaCount }}
  selector:
    matchLabels:
      app: {{ .Release.Name }}
  template:
    metadata:
      labels:
        app: {{ .Release.Name }}
    spec:
      {{- with .Values.imagePullSecrets }}
      imagePullSecrets:
        {{- toYaml . | nindent 8 }}
      {{- end }}
      containers:
        - name: app
          image: "{{ .Values.image.repository }}:{{ .Values.image.tag }}"
          ports:
            - name: http
              containerPort: {{ .Values.containerPort }}
          env:
            - name: APP_VERSION                 # 화면에 표시할 버전 = 이미지 태그
              value: {{ .Values.image.tag | quote }}
            {{- range $key, $value := .Values.env }}
            - name: {{ $key }}
              value: {{ $value | quote }}
            {{- end }}
          # 라즈베리 파이에서는 기동에 수십 초 걸림 → 최대 180초 기다림
          startupProbe:
            httpGet: { path: /actuator/health/liveness, port: http }
            periodSeconds: 5
            failureThreshold: 36
          livenessProbe:
            httpGet: { path: /actuator/health/liveness, port: http }
            periodSeconds: 10
          readinessProbe:
            httpGet: { path: /actuator/health/readiness, port: http }
            periodSeconds: 5
          resources:
            {{- toYaml .Values.resources | nindent 12 }}
charts/spring-boot/templates/service.yaml
apiVersion: v1
kind: Service
metadata:
  name: {{ .Release.Name }}
spec:
  type: {{ .Values.service.type }}
  selector:
    app: {{ .Release.Name }}
  ports:
    - port: {{ .Values.service.port }}
      targetPort: http
      {{- if and (eq .Values.service.type "NodePort") .Values.service.nodePort }}
      nodePort: {{ .Values.service.nodePort }}
      {{- end }}
5.2 values (이 클러스터의 실제 설정)
포트는 2편 nginx(31405) 다음 번호를 사용합니다.
| 앱 | NodePort | 접속 주소 |
|---|---|---|
| spring-hello | 31406 | http://192.168.20.206:31406/ |
| static-web | 31407 | http://192.168.20.206:31407/ |
values/spring-hello/values.yaml
replicaCount: 2

image:
  repository: ghcr.io/<YOUR_ID>/spring-hello
  tag: sha-1a2b3c4               # 4장에서 확인한 태그

env:
  # 브라우저가 CSS·이미지를 받아 갈 주소 → 노드 IP + static-web NodePort
  APP_STATIC_BASE_URL: http://192.168.20.206:31407

service:
  type: NodePort
  nodePort: 31406
values/static-web/values.yaml (2편 charts/nginx 의 값 구조 그대로)
replicaCount: 1

image:
  repository: ghcr.io/<YOUR_ID>/static-web
  tag: sha-5d6e7f8               # 4장에서 확인한 태그

service:
  type: NodePort
  nodePort: 31407
APP_STATIC_BASE_URL에 쿠버네티스 내부 주소(http://static-web)를 쓰면 안 됩니다. CSS·이미지를 요청하는 것은 파드가 아니라 사용자의 브라우저이기 때문에, 브라우저에서 접근 가능한 주소여야 합니다.
5.3 apps (Application 정의)
2편 3.3 의 nginx 와 같은 형태입니다. 차트도 values 도 같은 저장소에 있지만 multi-source 형태를 유지합니다.
apps/spring-hello.yaml
apiVersion: argoproj.io/v1alpha1
kind: Application
metadata:
  name: spring-hello
  namespace: argocd
  finalizers:
    - resources-finalizer.argocd.argoproj.io
spec:
  project: default
  sources:
    - repoURL: https://github.com/<YOUR_ID>/k8s-gitops.git
      targetRevision: main
      path: charts/spring-boot
      helm:
        releaseName: spring-hello
        valueFiles:
          - $values/values/spring-hello/values.yaml
    - repoURL: https://github.com/<YOUR_ID>/k8s-gitops.git
      targetRevision: main
      ref: values
  destination:
    server: https://kubernetes.default.svc
    namespace: hello
  syncPolicy:
    automated: { prune: true, selfHeal: true }
    syncOptions:
      - CreateNamespace=true
apps/static-web.yaml
apiVersion: argoproj.io/v1alpha1
kind: Application
metadata:
  name: static-web
  namespace: argocd
  finalizers:
    - resources-finalizer.argocd.argoproj.io
spec:
  project: default
  sources:
    - repoURL: https://github.com/<YOUR_ID>/k8s-gitops.git
      targetRevision: main
      path: charts/nginx                 # 2편 차트 재사용
      helm:
        releaseName: static-web
        valueFiles:
          - $values/values/static-web/values.yaml
    - repoURL: https://github.com/<YOUR_ID>/k8s-gitops.git
      targetRevision: main
      ref: values
  destination:
    server: https://kubernetes.default.svc
    namespace: hello
  syncPolicy:
    automated: { prune: true, selfHeal: true }
    syncOptions:
      - CreateNamespace=true
두 앱은 hello 네임스페이스에 함께 배포합니다. 2편의 nginx(default 네임스페이스)와 섞이지 않게 하기 위해서입니다.
push 전에 렌더링 결과를 미리 확인합니다. (2편 5.3 과 같은 방법)
helm template spring-hello charts/spring-boot -n hello \
  -f values/spring-hello/values.yaml | less

helm template static-web charts/nginx -n hello \
  -f values/static-web/values.yaml | less
6. 적용 및 확인
2편에서 root Application 이 apps/ 디렉터리를 보고 있으므로, push 만 하면 새 Application 2개가 자동으로 생성됩니다. kubectl apply 는 필요 없습니다.
git add .
git commit -m "add spring-hello, static-web"
git push origin main

# 바로 반영하려면 (기다리면 최대 3분)
argocd login 192.168.20.206:30443 --username admin --insecure
argocd app get root --refresh
kubectl -n argocd get applications
------------------------------------
NAME SYNC STATUS HEALTH STATUS
argocd Synced Healthy
headlamp Synced Healthy
metrics-server Synced Healthy
nginx Synced Healthy
root Synced Healthy
spring-hello Synced Healthy
static-web Synced Healthykubectl -n hello get pods,svc
------------------------------------
NAME READY STATUS RESTARTS AGE
pod/spring-hello-7c9d8b6f5d-4kq2x 1/1 Running 0 2m
pod/spring-hello-7c9d8b6f5d-p8m7z 1/1 Running 0 2m
pod/static-web-6b8f7d9c4-x2n5w 1/1 Running 0 2m
NAME TYPE CLUSTER-IP PORT(S) AGE
service/spring-hello NodePort 10.96.112.45 80:31406/TCP 2m
service/static-web NodePort 10.96.201.13 80:31407/TCP 2mspring-hello 파드는 라즈베리 파이에서
READY 1/1이 되기까지 30초\~1분 정도 걸립니다. 그동안은 startupProbe 가 기다려 주므로 재시작되지 않습니다.
6.1 정적 리소스 확인
curl -I http://192.168.20.206:31407/css/style.css
# HTTP/1.1 200 OK
# Content-Type: text/css
# Expires: ...
# Cache-Control: max-age=3600
# Access-Control-Allow-Origin: *
6.2 Spring Boot 확인
# 여러 번 호출하면 pod 값이 두 파드 사이에서 바뀜
for i in $(seq 1 6); do curl -s http://192.168.20.206:31406/api/hello; echo; done
# {"message":"Hello, World!","version":"sha-1a2b3c4","pod":"spring-hello-7c9d8b6f5d-4kq2x"}
# {"message":"Hello, World!","version":"sha-1a2b3c4","pod":"spring-hello-7c9d8b6f5d-p8m7z"}
브라우저에서 http://192.168.20.206:31406/ 에 접속해 카드 스타일과 로고 이미지가 보이면 두 앱이 연결된 것입니다. 개발자 도구 Network 탭에서 style.css, logo.png 가 :31407 에서 받아진 것을 확인할 수 있습니다.
- spring-hello :
http://192.168.20.206:31406/ - static-web :
http://192.168.20.206:31407/ - ArgoCD :
https://192.168.20.206:30443/(Application 2개 추가 확인)
7. 새 버전 배포: 앱 push → 태그 1줄 변경
코드를 고친 뒤의 배포는 두 번의 push 입니다. 앱 저장소 push 로 이미지가 만들어지고, k8s-gitops 저장소 push 로 배포됩니다.
- 앱 저장소(spring-hello 또는 static-web)에서 코드를 수정하고 push
- GitHub Actions 가 새 이미지
sha-9f8e7d6을 ghcr.io 에 push - k8s-gitops 에서 values 의
image.tag한 줄만 변경 후 push
cd k8s-gitops
vi values/spring-hello/values.yaml     # tag: sha-9f8e7d6
git commit -am "spring-hello sha-9f8e7d6"
git push
ArgoCD 가 Deployment 의 image 가 바뀐 것을 감지해 롤링 업데이트합니다. readinessProbe 가 통과한 새 파드만 트래픽을 받으므로, 6.2 의 curl 반복 호출을 켜 둔 채로 배포해도 응답이 끊기지 않습니다.
kubectl -n hello rollout status deployment/spring-hello7.1 왜 latest 를 쓰지 않는가
values 에 tag: latest 를 적으면 새 이미지가 올라와도 Git 에는 아무 변화가 없으므로 ArgoCD 가 배포할 이유가 없습니다. 또 지금 어떤 코드가 돌고 있는지 Git 만 보고는 알 수 없게 됩니다.
sha- 태그를 쓰면 다음이 모두 Git 으로 해결됩니다.
- 현재 배포 버전 = values 의 태그 = 앱 저장소의 커밋
- 롤백 =
git revert후 push (2편 6.1 과 동일) - 배포 이력 = k8s-gitops 의 커밋 로그
7.2 태그 변경을 자동화하려면
태그 수정이 번거로워지면 다음 두 가지 방법이 있습니다.
- 앱 저장소 Actions 에서 k8s-gitops 에 커밋 : 빌드 마지막 단계에서 values 의 태그를
sed로 바꾸고 push. k8s-gitops 쓰기 권한이 있는 토큰을 앱 저장소 Secret 으로 등록해야 합니다. - Argo CD Image Updater : 레지스트리를 감시하다가 새 태그가 생기면 Git 에 자동 커밋. 별도 컴포넌트를 설치해야 합니다.
두 방법 모두 결국 Git 의 태그가 바뀌어서 배포된다는 원칙은 같습니다. 이 글에서는 흐름이 잘 보이도록 수동으로 둡니다.
8. 주의사항과 문제 해결
8.1 exec format error 로 파드가 바로 죽을 때
이미지에 arm64 가 없는 경우입니다. 4장 workflow 의 platforms 에 linux/arm64 가 있는지, 그리고 이미지에 두 아키텍처가 모두 들어갔는지 확인합니다.
docker buildx imagetools inspect ghcr.io/<YOUR_ID>/spring-hello:sha-1a2b3c4
# Platform: linux/amd64
# Platform: linux/arm64   ← 이 줄이 있어야 함
8.2 ImagePullBackOff
대부분 패키지가 아직 Private 이거나, 이미지 경로에 대문자가 섞인 경우입니다. Private 으로 유지하고 싶다면 read:packages 권한 토큰으로 pull Secret 을 만들고 values 에서 참조합니다.
kubectl create namespace hello
kubectl -n hello create secret docker-registry ghcr-pull \
  --docker-server=ghcr.io \
  --docker-username=<YOUR_ID> \
  --docker-password=<GITHUB_TOKEN>
# values/spring-hello/values.yaml 에 추가
imagePullSecrets:
- name: ghcr-pull2편 6.3 과 마찬가지로 이 Secret 은 Git 에 커밋하지 않습니다. 또 2편의
charts/nginx에는imagePullSecrets가 없으므로, static-web 도 Private 으로 쓰려면 5.1 의 deployment.yaml 처럼with .Values.imagePullSecrets블록을 추가해야 합니다.
8.3 메모리: OOMKilled 와 느린 기동
- JVM 은 컨테이너 limit 를 기준으로 힙을 잡습니다(
MaxRAMPercentage=75→ limit 512Mi 중 약 384Mi).OOMKilled가 보이면values/spring-hello/values.yaml에서resources.limits.memory를 올립니다. - 라즈베리 파이 4GB 에서는 2편의 ArgoCD + Headlamp + 이번 spring-hello 2개(최대 1Gi)가 함께 올라갑니다.
kubectl top pods -A로 여유를 확인하고, 부족하면replicaCount: 1로 줄입니다. - 기동이 180초를 넘겨 재시작이 반복되면 차트의
startupProbe.failureThreshold를 늘립니다.
8.4 static-web 헬스체크
3.2 에서 만든 /healthz 는 2편 charts/nginx 에 probe 가 없어서 아직 쓰이지 않습니다. 필요하면 charts/nginx/templates/deployment.yaml 의 컨테이너에 다음을 추가합니다. (2편 nginx 공식 이미지에는 /healthz 가 없으므로 path: / 를 쓰는 편이 두 앱 모두에 안전합니다.)
          readinessProbe:
            httpGet: { path: /, port: 80 }
            periodSeconds: 5
8.5 CSS 를 고쳤는데 화면이 그대로일 때
static-web 은 1시간 브라우저 캐시를 주기 때문에, 파일 이름이 같으면 이전 CSS 가 보일 수 있습니다. 강력 새로고침(Ctrl+Shift+R)으로 확인하고, 운영에서는 style.css?v=버전 처럼 쿼리 문자열이나 파일명에 버전을 붙여 캐시를 무효화합니다.
8.6 HTTPS 로 바꿀 때
나중에 spring-hello 를 HTTPS 로 서비스하면서 APP_STATIC_BASE_URL 이 http:// 로 남아 있으면, 브라우저가 혼합 콘텐츠(Mixed Content) 로 CSS·이미지를 차단합니다. 두 앱을 Ingress 뒤에 같은 도메인으로 묶을 때 함께 바꿔야 합니다.
9. 정리
2편 → 3편 변경 요약
| 항목 | 2편 | 3편 |
|---|---|---|
| 배포 대상 | 공식 이미지(nginx, metrics-server 등) | 직접 빌드한 이미지 2개 |
| 이미지 빌드 | 없음 | GitHub Actions (amd64 + arm64) |
| 레지스트리 | Docker Hub 등 공개 레지스트리 | ghcr.io (sha- 태그) |
| 차트 | charts/nginx |
charts/spring-boot 추가, charts/nginx 는 static-web 에 재사용 |
| 앱 구성 | 단일 nginx | WAS(spring-hello) + 정적 리소스 서버(static-web) 분리 |
| 배포 트리거 | values / targetRevision 변경 | values 의 image.tag 변경 |
| 수동 작업 | 최초 1회 | 앱 push 후 태그 1줄 수정 (7.2 로 자동화 가능) |
저장소는 세 개가 되었지만 역할은 명확합니다. 앱 저장소는 이미지를 만들고, k8s-gitops 는 무엇을 배포할지 결정하고, ArgoCD 는 그대로 반영합니다.
참고
- Kubernetes – ArgoCD + Helm 으로 Native Helm + GitOps Values 패턴 구성하기 (2편)
- Spring Boot 4.1.0 available now – spring.io
- Spring Boot 4.1 Release Notes – GitHub wiki