Table of Contents
SketchUp Plugin 개발하기 01
Dev Tool 생성
개발을 위한 메뉴를 생성합니다.
C:\Users\계정이름\AppData\Roaming\SketchUp\SketchUp 버전\SketchUp\Plugins\ 폴더에 아래 파일을 생성하고, SketchUp 을 재실행합니다.
my_devtool.rb
require "sketchup.rb"
require "extensions.rb"

my_devtool_loader = SketchupExtension.new "My Devtool Loader", "my_devtool/main.rb"
my_devtool_loader.copyright= "Copyright 2023 skyer9"
my_devtool_loader.creator= "skyer9"
my_devtool_loader.version = "1.0"
my_devtool_loader.description = "My Devtool"
Sketchup.register_extension my_devtool_loader, true
my_devtool/main.rb
require "sketchup.rb"
module My_devtool
PLUGIN_ROOT ||= "C:/Users/oem/AppData/Roaming/SketchUp/SketchUp 2020/SketchUp/Plugins/"
def self.reload
load (File.join(PLUGIN_ROOT, "my_devtool.rb"))
load (File.join(PLUGIN_ROOT, "my_devtool/main.rb"))
end
def self.hello
puts "Hello, world!"
end
end
unless file_loaded?(__FILE__)
mymenu = UI.menu("Plugins").add_submenu("My Devtool")
mymenu.add_item("Reload plugins") {My_devtool::reload}
mymenu.add_item("Hello, World!") {My_devtool::hello}
file_loaded(__FILE__)
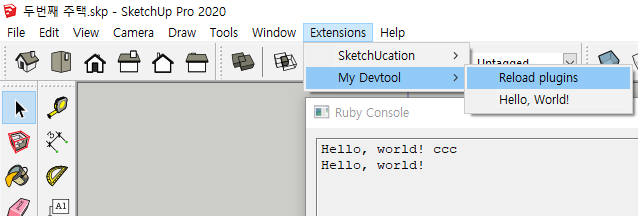
end메뉴가 추가된 것을 확인할 수 있고, Ruby Console 을 실행후 메뉴를 실행하면 결과를 확인할 수 있습니다.
Hello, world! 문자열을 변경해 가면서 Reload plugins 를 해보면 문자열이 변경되는 것을 확인할 수 있습니다.
개발을 하다보면 아래처럼 됩니다.
require "sketchup.rb"

module My_devtool

    PLUGIN_ROOT ||= "C:/Users/oem/AppData/Roaming/SketchUp/SketchUp 2020/SketchUp/Plugins/"

    def self.reload
        load (File.join(PLUGIN_ROOT, "my_devtool.rb"))
        load (File.join(PLUGIN_ROOT, "my_devtool/main.rb"))

        load (File.join(PLUGIN_ROOT, "skyer9_doorwindow.rb"))
        load (File.join(PLUGIN_ROOT, "skyer9_doorwindow/dwc_parametric.rb"))
        load (File.join(PLUGIN_ROOT, "skyer9_doorwindow/main.rb"))
    end

    def self.clear_console
        SKETCHUP_CONSOLE.clear
    end
end

unless file_loaded?(__FILE__)
    mymenu = UI.menu("Plugins").add_submenu("My Devtool")
    mymenu.add_item("Reload plugins") {My_devtool::reload}
    mymenu.add_item("Clear Console") {My_devtool::clear_console}
    file_loaded(__FILE__)
end
벽 뚫기
# 현재 face 가 속한 모들에 반대면을 찾는다.
pt1 = face1.outer_loop.vertices[0].position
# 두 면 사이에 레이저를 쏘아 존재하는 오브젝트를 찾는다.
result = model.raytest( [ pt1, face1.normal.reverse ] )

# 결과가 있으면
if result
    # 첫번째 오브젝트를 가져온다.
    pt2 = result.first
    # face 인지 체크한다
    if result.last[0].is_a?(Sketchup::Face)
        face2 = result.last[0]
        # 두 면의 거리를 계산한다.
        dist  = pt1.distance(pt2)
        # pushpull 한다.
        face1.pushpull(-dist)
    end
end
JointPushPull
JointPushPull Classic 이 소스가 암호화되어 있지 않습니다.
많은 참고자료가 될 듯 합니다.
경고창
화면 오른쪽 하단에 표시
notification = UI::Notification.new(
    Sketchup.extensions[0],
    "Select faces before Executing.",
)
notification.on_accept("OK") do |notification, title|
    puts "Info : Select faces before Executing."
end
notification.show
화면 중앙에 표시
UI.beep
UI.messagebox "Select faces before Executing."
Ruby Variable
전역 변수
$ 로 시작합니다.
$global_variable = 10클래스 인스턴스 변수
@ 로 시작합니다.
class Customer
   def initialize(id, name, addr)
      @cust_id = id
      @cust_name = name
      @cust_addr = addr
   end
   def display_details()
      puts "Customer id #@cust_id"
      puts "Customer name #@cust_name"
      puts "Customer address #@cust_addr"
   end
end
클래스 변수
@@ 로 시작합니다.
클래스간 공유가 됩니다.
class Customer
   @@no_of_customers = 0
   def initialize(id, name, addr)
      @cust_id = id
      @cust_name = name
      @cust_addr = addr
   end
   def display_details()
      puts "Customer id #@cust_id"
      puts "Customer name #@cust_name"
      puts "Customer address #@cust_addr"
   end
   def total_no_of_customers()
      @@no_of_customers += 1
      puts "Total number of customers: #@@no_of_customers"
   end
end
지역 변수
소문자 또는 밑줄문자로 시작합니다.
상수
알파벳 대문자로 시작합니다.
```

```rb